I use GitHub to keep the code, decisions and tasks of my projects in one place. Connecting it to ChatGPT lets me retrieve that information without pasting files into every conversation.
My recommendation: enable the GitHub connector offered in ChatGPT, link your account and limit access to the repositories you actually need.
1. Enable GitHub in ChatGPT
This tutorial assumes you already know GitHub and what a repository (or repo) is. You need a GitHub account and a test repository with no sensitive data, containing an easily recognizable README.md.
- In ChatGPT, open Settings → Plugins (or Apps, depending on your interface).
- Search for GitHub, then start the connection.
- On GitHub, check the account shown and authorize the application.
- Back in ChatGPT, use the repository access row and its configure link (« Accès au dépôt » and « Configurer sur GitHub » in the French screenshot below) to install the connector on the relevant account or update an existing installation.
- Select the repositories you need and save. To start with, one is enough.
On GitHub, the application to authorize is called ChatGPT Codex Connector. You do not need to use Codex CLI to follow this tutorial.
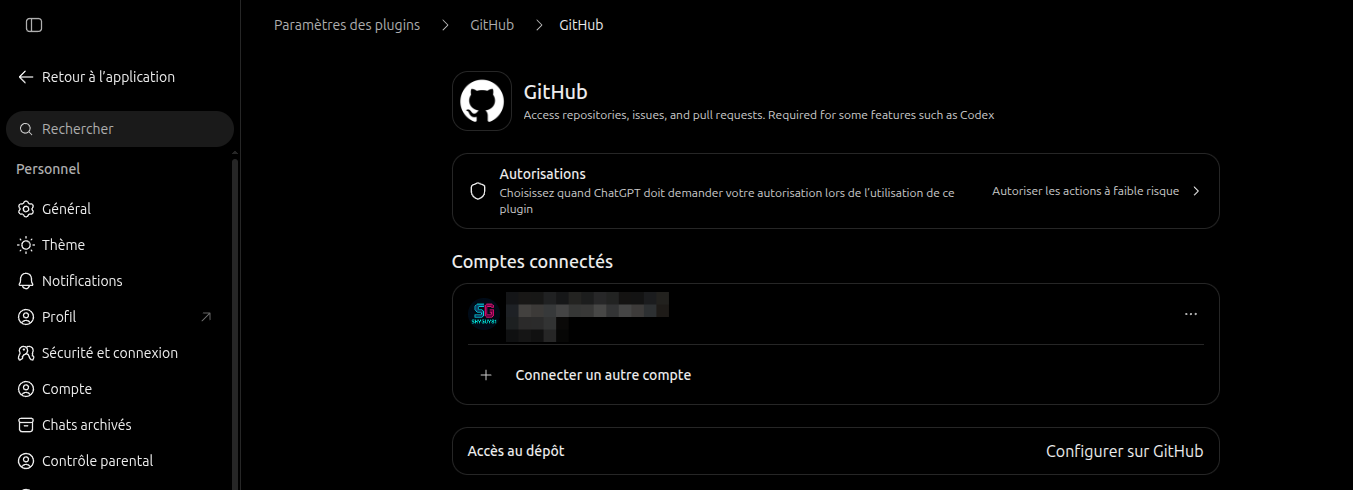
Screenshot taken on October 15, 2026, from the French interface. Labels and GitHub availability may vary depending on your account, language and workspace.
Check the selection: all repositories may already be authorized. If you manage private repositories, I recommend limiting access to the essential ones only. This reduces the exposure of your projects and the risk of mixing up repositories when you make requests.
For an organization's repository, administrator approval may also be required.
2. Choose or change repositories on GitHub
You can review the selection directly on GitHub:
- Personal account: profile picture → Settings → Applications → Installed GitHub Apps → Configure, next to the connector's application.
- Organization: Your organizations → Settings → GitHub Apps, under Third-party Access, then Configure.
Under Repository access, choose Only select repositories, adjust the list and click Save. What you can change depends on your role in the account or organization.
You can choose which repositories the application can reach. The Permissions section shows what it is allowed to do there.
3. Check that ChatGPT reaches the right repository
In a conversation where GitHub is available, ask:
In the repository
owner/repo, find theREADME.mdfile, summarize its purpose in three sentences and tell me which file you used.
Replace owner/repo with the exact name of the repository, owner included, then compare the answer with the file on GitHub. Specify this name in every request, especially before any change, even if several repositories are authorized. This reduces the risk of the agent working on the wrong project.
If the repository is missing, check in this order:
- The connected GitHub account.
- The repository selection under Repository access.
- Any pending organization approval.
- The full repository name and the path of the requested file.
If GitHub shows the message "ChatGPT Codex Connector has not been installed on any accounts you have access to", the application is not installed on any account or organization you have access to. Open the application's installation page directly, choose the account or organization, then select the repositories: github.com/apps/chatgpt-codex-connector/installations/select_target.
If the permissions are correct but GitHub is still unavailable in the conversation, try opening a new chat where GitHub is available. If needed, disconnect then reconnect the GitHub account from ChatGPT's settings, and check the repository selection again. These are troubleshooting leads, not steps that are always necessary.
For the specific case of an organization that could not be added during installation, I documented the workaround that helped me in July 2026.
What about working with an agent in the terminal?
For terminal workflows, I recommend GitHub CLI (gh) with an agent such as Codex CLI or Claude Code. The agent can use it to read issues or create pull requests, depending on the available permissions. This connection is independent of the ChatGPT connector.
Record this preference in the instructions file your agent recognizes. Configuration and example rules deserve a separate tutorial.
For a first try, the goal stays simple: authorize one specific repository and get a verifiable answer about one of its files.
Sources:
- Connecting GitHub to ChatGPT and connected apps in ChatGPT — OpenAI help center, consulted on September 28, 2026.
- Reviewing and modifying installed GitHub Apps and GitHub CLI manual — consulted on October 15, 2026.